1986 Mako 231 Rebuild

note: been working on this for a little while, going to cut and paste previous post from other sites to get up to date here

Hey guys - I’ve followed various builds on this site for years, and I finally am at a point where I have the time to pursue one myself. I love the idea of taking something old and making it new again, exactly the way I want it, and the Mako community made the decision pretty easy.

I have a boat already, but I have found that I am always improving things and adding upgrades, but it was getting to the point where the boat wasn’t really worth putting the time and $ into ('06 Angler 204, despite the bad rap not a bad beginner boat in my opinion, but definitely not something I wanted to keep forever.)

I wanted a 22-25 boat that I could outfit the way I wanted, big enough to get offshore a little ways but shallow enough to fish the bays, and comfortable enough to keep the family happy. Well, those boats definitely exist, but I don’t have $150k to drop on one…

After a LOT of research, reading every post of the Mako History Q&A thread about three times, countless discussions on this site and others, I decided that the 224 and derivatives (221, 231, etc etc) would be the perfect platform to start a “custom” rebuild of a classic. Since I was looking for a pretty specific hull (the 231 was my first choice) I was afraid I might either be looking for a while or compromise, but then got a tip off that this girl was available:

1986 231

listing suggested the boat had already been partially restored, solid decks, new tank, and was essentially ready for paint, with a working trailer. Turns out maybe not quite true (more to follow on this…) but hull generally sound and exactly what I was looking for so I went for it anyway.

So here we go. I am still in the planning stages, but I have a lot of ideas for what I want and my goal is to incorporate everything on my “boat wishlist” in this build. :smiley:

Som

first order of business was getting the trailer actually road worthy. Spent way too much time and $$ and rolling around on the ground in a parking lot to take it from this:

to this:

HUGE thanks to Andy, Frank, Mike, and rest of crew at Melbourne FL Northern Tool!

Long but relatively uneventful drive back to VA.Had to get a little creative with the trailer lights…

Finally got her home, and started really taking stock of what I have to work with. Everything generally seems solid, but there are tons of holes and wet core so it’s all coming out.


Angler 204 FX
Yamaha 150

Guy that I bought from didn’t know details of the “new” tank, so I was anxious to see what was going on. Luckily, coffin cover and console were already loose so that made it easy.

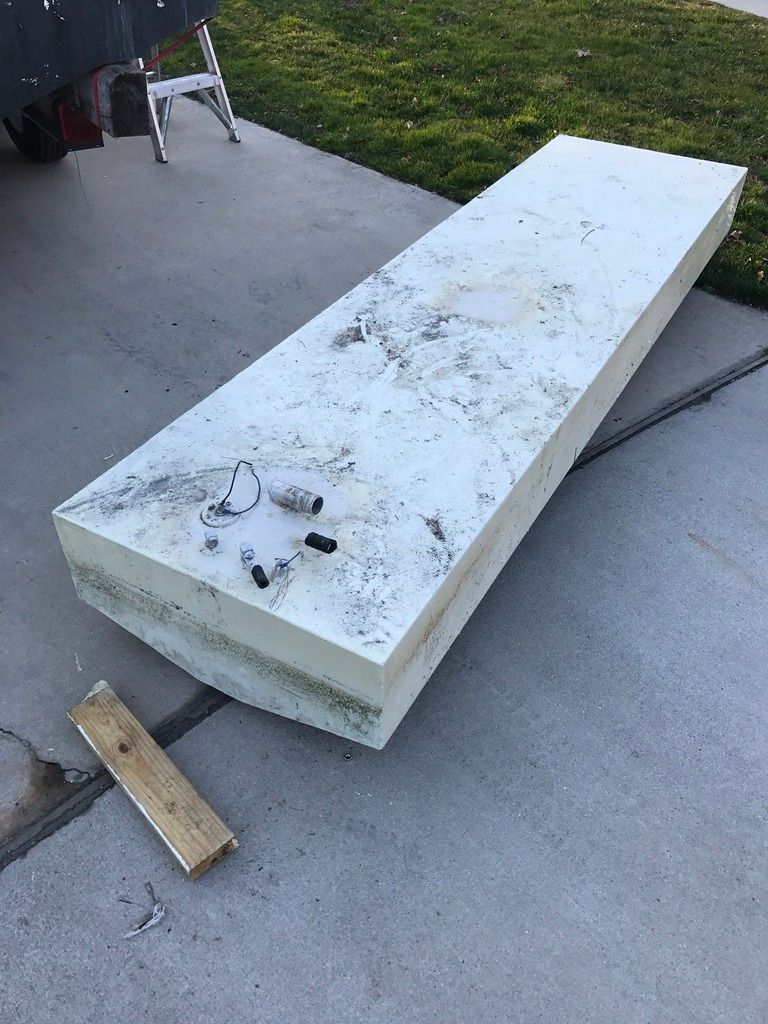
I had hoped (but not really expected) to find a beautiful new tank… well, not sure what to think about what was in there, except that I’m pretty sure it has to go. Super flimsy, like it was home made out of too-thin aluminum. No manufacture/test label plate. Top was wavy and warped. Note the “foamed” in installation :smiley:. Yes, those are pieces of 2x4. I guess it would have worked but not for me.

Coffin cover was shockingly heavy - not sure if they’re always like that or it’s just waterlogged? definitely some areas were core is exposed.

Some stress cracks at transom, but that will get redone anyway.

Free goodies that came out of boat!

new emblems and capacity plate (for a 232). Look at those 232 emblems closely…:stuck_out_tongue:


Angler 204 FX
Yamaha 150

between knocking out some home improvement projects and crappy weather haven’t had a chance to work on boat much. Finally had a chance to get her cleaned up, a little work w/pressure washer took her from this:

to this:

Original gel coat is in great condition for the most part. I will most likely paint, but nice to have a good surface to work from. Went over hull in more detail, also in very good shape (unless there are surprises hidden under the bottom paint). unfortunately pressure washer didn’t faze the painted on name at all…

Question for all the 231 owners - what type of drain did the forward storage have originally? I can’t imagine it came from the factory with just a hole drilled through. Also, I can tell the cutout under the gunnels has been molested.

poked around some more at the “new” tank, pulled out all the fuel lines and rest of junk from bilge. Hoses a little dirty but look brand new so I will probably keep and reuse if possible, every bit of $ I can save helps!

Although everything still seems pretty solid, just about every cored surface has unsealed holes drilled in it, including transom. :dizzy_face:

Been working on a plan of attack and getting organized, hope to start some real work in a few weeks.


Angler 204 FX
Yamaha 150

A little work today, got the tank out and cleaned up the coffin. After really looking over the new tank that came in the boat, I don’t want to use it. No label plate, feels super flimsy and flexy, no mounting tabs. It was wedged in place with some 2x4s, a little foam, and some rubber strips I’m 98% sure were cut up mudflaps! Might be 2 lb pour PU, might just have been the spray stuff in a can :smiley:. Either way, not the way I want it! I just don’t trust it, might be fine but sure would suck to put in a ton of work and have the tank fail.

That being said, if anybody wants to take a chance on it (it is supposedly a new 140 gal tank) PM me and you can have it if you can pick it up. Otherwise it will go on craigslist and then to the scrap yard.

Coffin was full of nasty water, mud, leaves, etc. I am starting to think this boat may have spent some time on the bottom of a lake based on the mussel shells I keep finding…

I have a love/hate relationship with my garage - its always full of crap, but then again I when I need random crap like a pump, yep got it.

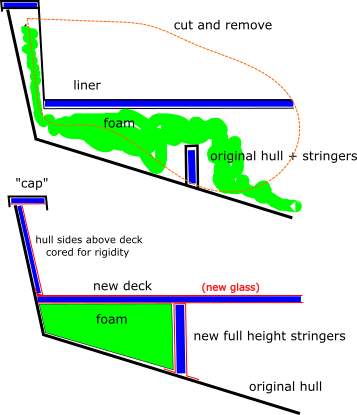
Pretty much done with the initial clean up, going to be time to start cutting soon. Based on what I’ve found so far, I have no confidence that the wood core anywhere is going to be intact, so I’m working out a plan to get it all out. I plan to remove cap/liner, but don’t think it’s going to be feasible for me to do all in one piece. I think the basic strategy will be to cut out the deck and most of the liner in as few pieces as I can to make it manageable, leave the upper portion of liner as a “cap” in plac

so to clarify, I intend to remove the original liner - deck, gunnel tops and all so I can get at stringers and transom easier. I just don’t think I’ll have the resources and facilities to pull and work on the liner in one piece, so my plan is to remove it in sections and rebuild the boat with new deck and a cap made from the top of the old liner. But since the liner originally contributed to the stiffness of the structure, I would have to do something to add rigidity back in. Hence coring the hull sides above the deck.

I don’t want to leave the hull completely unsupported to prevent distortion, so would leave most of the top of liner (which becomes the “cap”) in place to provide some support until rest of the structural work is done. Then could pull the cap and recore it.

to me this seems like the most logical way, but if anybody has input I’m open to suggestions. haven’t cut anything yet!


Angler 204 FX
Yamaha 150

Finally got some real work done today!

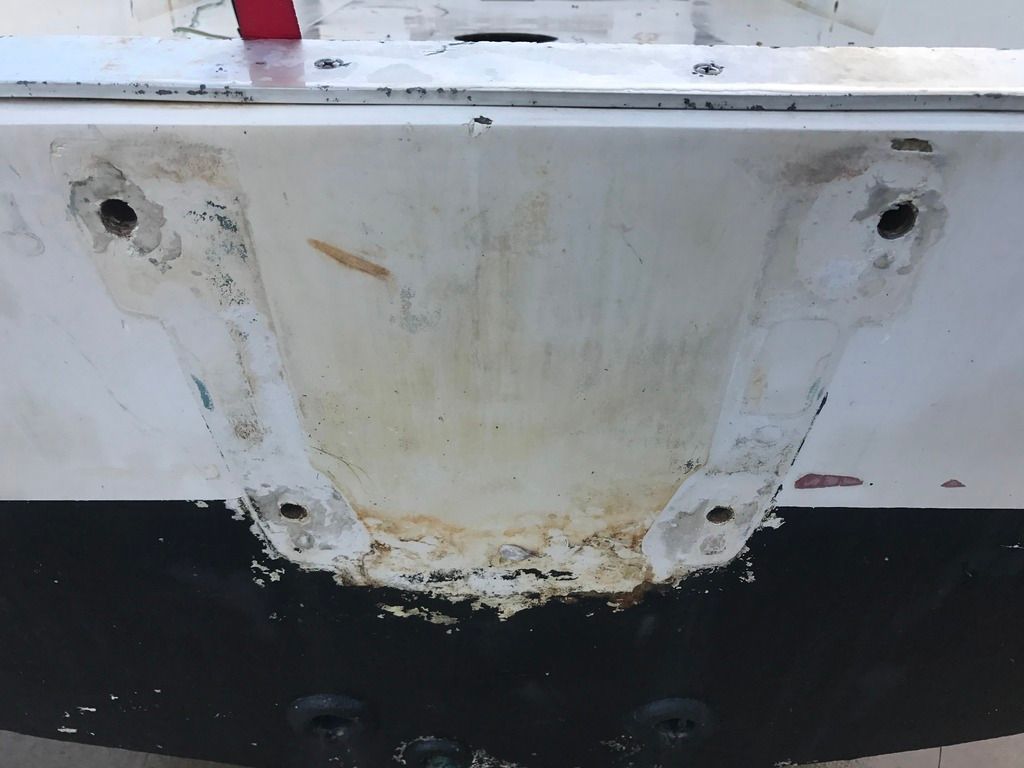
Started with removing the aluminum angle over transom. Not too pretty underneath:

Took a while to get all the old screws out holding the liner in place (all through bolted, plenty stripped/heads ground off/filled in with resin, etc). Also a ton of rivets, not sure if that’s factory or if the liner has been pulled before? anyway, got all cleared from the back few feet.

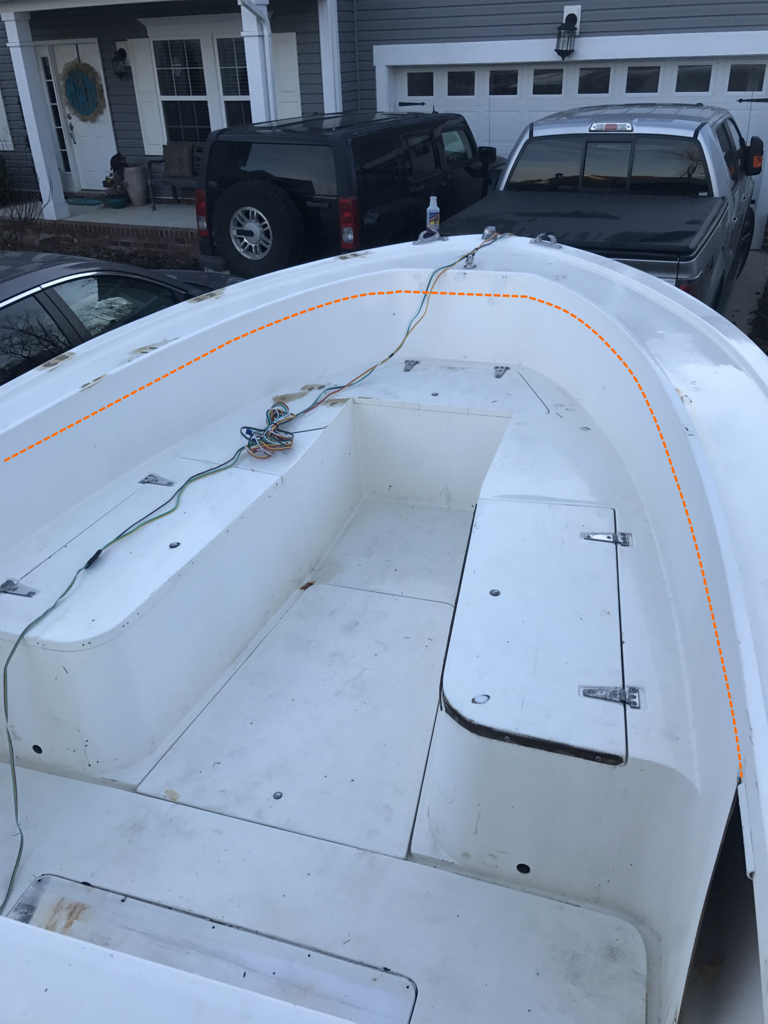
I don’t plan to reuse the fishboxes, so that made an obvious break point to start cutting. I left a few inches around the coffin box to allow it to be tabbed in easier if I reuse it later. Eventually I will extend the cap all the way back to the transom, so that area will all have to be redone anyway. Laid out cuts, then went to town with an angle grinder and a plethora of saws.

Discovered that there are some extra connections between liner and hull hidden behind the forward panel inside those boxes - kind of goofed up my neatly laid out cut lines, but whatever. Now I know for the next time…:smiley:

As soon as I finished cutting I wished I had left a little more glass aft of the (spray rail? not sure what its called, the raised rim that runs along the inside of the cap and then sweeps outward just before the fishboxes), would have given me some more options when I go to tie in there later. Oh well, I’ll deal with it one way or another.

took a while, but after a few sessions of jacking up various points the entire aft deck/liner/cap structure popped free! I have to say, I have a new respect for: 1) the guys that do this without pulling up the decks, and 2) the guys that manage to pull the whole liner at once. holy crap

the destruction continues… :smiley:

so after opening up the back end last weekend, the goal for this weekend is to get the transom ready for rebuild/recore. Pulled out as much hardware and thru hulls as I could, then cut out the last foot or so of stringer to get some room to work with. not totally rotten, but wet and some rot running through both. Still have to deal with the scupper thru hulls, did not want to budge. Maybe after an overnight soak with some PB Blaster.

Also found this crack in the bilge. Was afraid it went through hull and I somehow missed it on my inspections, but after cutting it turned out to just be the glass over the mounting pad, which was super wet and rotten.

Continued on cutting around perimeter of inside transom skin, I plan to leave the outside skin intact to maintain the original integral tie to the rest of the hull. Then peeled the inner skin off.

Transom was mostly solid, but all wet and lots of rot in the corners. Literally bare wood in upper corners! :roll_eyes:

hellacious mess of cutting and prying instruments, old glass, and rotten plywood. Once the inner skin was off I went to town with a circular saw and chisel to score the old wood and knock it out. A few big chunks of the first layer pulled right out, but the second layer of plywood was a beeotch.

had to pack it up for the night, but going at it again tomorrow between Chuck-E-Cheese bday for friend’s kid and smoking some c

the fun continued yesterday and today. Finally managed to get the thru hulls loose and wrangle the last big chunk of plywood at the bottom out. Super nasty.

worked the core back as far as I could w/combination of circular saw, oscillating saw, and good ol hammer and chisel.

Today I went to work grinding out the remnants of the plywood. Knocked down the thicker wood with a 7" sander and 36 grit, then switched to angle grinder w/ 36 grit flap wheel for the details and final sanding.

Say hello to my little friend:

probably only had to take off 1/32" or less, but across the whole transom that makes a hell of a lot of dust!

Cut/ground back edges all around the transom. Areas where stringers used to be turned out to be a huge PITA. Mako essentially just slapped some roving loosely over the stringers and into the bilge, and years of water crept in between the layers at the edges. I just kept grinding back the black delamintated areas until I found “healthy” solid pink glass. I will proabably put a little time into smoothing out the bilge, its a lumpy mess of jagged roving and gobs of resin. Yes, I know its the bilge, but its my boat and I can waste my time however I want! (there is a practical aspect, its a hell of a lot easier to keep clean when there aren’t any places for dirt to accumulate.)

ugh expect I am going to have the same issue the entire length of both stringers…

and this, kids, is why we wear

ok, think that brings it current. Will try to keep this updated along with threads on other sites.


Angler 204 FX
Yamaha 150

Very nice.

Subscribed.


Key West 2300 Bluewater

Reeeeeeely nice project;;;keep posting progress:smiley::smiley::smiley:

George McDonald ; MAD Charleston
[http://www.militaryappreciationday.org

When you see “Old Glory” waving in the breeze, know that it is the dying breaths of our fallen hero’s that makes it wave.
author unknown

Cool, keep us posted. Slightly more involved than the jonboat “restore” I did a few years ago.

“Apathy is the Glove into Which Evil Slips It’s Hand”, but really, who cares?

First and foremost:

Where ever my friend Cracker Larry is, I know he is enjoying this!
I miss his input.

Second, buy a quality respirator!!! Your young lungs will thank you latter.

We’ll be starting a bromance…I like your initiative and your plan. Just because it’s old, doesn’t mean it’s done…take me and boatpoor as an example. You take a great hull and put some work in it, and you got a GREAT BOAT…just the way YOU like it. Batteries/bilge pumps/fittings/wiring/steering/etc that you can get to…without being a gymnast or that you can “fix” without taking the boat apart.

I forgot, did you ask for comments?

Bracket versus transom mount?
COB/COG is going to change moving 500+ pounds back 3 ft. I have a 25 Bertram changed from I/O to single Suzuki 300 on an old stainless Armstrong bracket, so I can speak from experience. The ride will change. I mentioned this about the 29 Albermarle with the seakeeper in it.

The motor/hull/seating/fish boxes are Static weight…fuel is Dynamic weight. Before you rebuild, find the literature on the COG/COB point on your specific hull.

Great Lakes Skipper has many fuel tanks that are hull specific…or close to your needs…and they’re plastic!!! Your fuel placement will be critical with a bracket on a transom designed hull. Did I mention COB/COG?

If my comments are too much…say so…I got tough skin. I respect your work ethic and it will be rewarded with something YOU made whole…or hole for boatpoor.

^^^^^^^^^agreed many times over^^^^^^^^^^^^^^^

still no word on CL??? reeeeely was hoping to hear from him !!!

George McDonald ; MAD Charleston
[http://www.militaryappreciationday.org

When you see “Old Glory” waving in the breeze, know that it is the dying breaths of our fallen hero’s that makes it wave.
author unknown

Great work Wolfie! I’ve got an 89’ 261 and my family and I have enjoyed almost everything about the boat (almost meaning everything except for the open transom and below deck live well…). I haven’t gone as far as you but I did pull the tank and rewire the entire boat last year.

Maybe one day I’ll add a bracket and repower but for now I’ll stick to reading your posts:smiley:

Keep up the good work!

thanks for the interest, questions and comments always welcome! I don’t always know what I’m doing but I usually fake it well… feel free to point out any stupid mistakes! :smiley:

I am very concerned about changes in the CB/CG with the bracket. Mako did make a later version of this hull with a factory bracket, so I know it can be done well but since I plan to power with a 4-stroke thats probably heavier than the boat was originally designed for even factory bracket specs probably won’t be quite right. Still researching and trying to learn as much as I can about basic design/naval architecture along the way. I have an engineering background, so I get the concepts but there are definitely some pretty esoteric thumbrules and methods for calculating this stuff in the NA world. (“scantlings”? come on, is that even a word? :stuck_out_tongue:) Hard to find good, modern references too. But seems like the basic idea will be a flotation bracket properly sized for weight of outboard to position center of buoyancy correctly, and adjust placement of fuel/livewells/people/etc as necessary in-hull to correct the center of gravity location. Probably easier said than done, I’m afraid - hard to find real data. Don’t need all the answers just yet but will have to make some decisions soon.

just got home from a few weeks of travel, so hope to get back to the grunt work later this week!


Angler 204 FX
Yamaha 150

Great project,good job, you realy jumped in and ran with it, try to get all the grinding done before it gets hot. As someone mentioned get your self a quality resporator! Glad I got my transon replaced last winter and have had the boat back in the water.I’m lucky I have a yard full of boats to use and didn’t have to rush and half A do it! Keep us posted on the progress. Will find the plans and pictures of my homemade bracket i built with a welder and skillsaw.

Thanks for posting it here. I love. Build threads

2006 23 SeaCraft, 2008 Suzuki 250.

Will 3D print anything for a fishing trip! Good luck and thanks for sharing!!!

Mark Ingle
NauticStar 1810 Merc 90